- ...
- SDK
- Yocto
- ...
- ...
- your first application
- tools
- ...
- Qt: register
- Qt: create project
Using Qt Creator#
To develop Qt application Qt Creator is probably the way to go IDE. But in order to cross compile the application for the target you want, it has to be configured first. Indeed the first time you want to use the Yocto SDK you will have to add a new development kit for your device adding:
a device
a development kit using:
a Qt version
a compiler
a debugger
a CMake
Then each project must be configured to use that new kit, and to use SimpleSwitch™ commands to build, deploy and run the application.
These 2 configuration steps could be done thanks to 2 scripts:
- qtcreator-kit-configurator
- qtcreator-project-configurator
In order to use the scripts to configure Qt Creator please refer to Option 1: configure Qt Creator using scripts. Naturally it is possible to configure Qt Creator manually, in that case please refer to Option 2: configure Qt Creator manually.
Source Yocto SDK environment
The Yocto SDK environment must be sourced to call the configurator scripts and to start Qt Creator. So you can start Qt Creator thanks to a terminal doing:
. /opt/sc/0.1.0/sm2s-imx8plus/environment-setup-cortexa53-crypto-simplecoredistro-linux
qtcreator
Option 1: configure Qt Creator using scripts#
Adding a kit and a device using the script#
The script to add a new device and kit is qtcreator-kit-configurator.
With that tools three arguments should be used:
-ato choose the address IP of the device.-cto select the path to the Qt Creator configuration directory.-nto choose the name of the new kit.
So for example if:
you had installed Qt Creator from the Ubuntu deb package, the configuration path should be
~/.config/QtProject/qtcreator/.the IP address of the target is
192.168.0.46the SDK is made for an
sm2s-imx8plus
You could just do:
SIMPLESWITCH_TEMPLATE=qt6commercial qtcreator-kit-configurator -a 192.168.0.46 -c ~/.config/QtProject/qtcreator/ -n sm2s-imx8plus-kit
    ## On your computer run
    qtcreator-kit-configurator -a 192.168.0.46 -c ~/.config/QtProject/qtcreator/ -n sm2s-imx8plus-kit
Configure a project using the script#
Note
Only projects using Qmake build system can be configured by the script for the moment.
The script to configure the project is qtcreator-project-configurator.
With that script, 2 arguments are mandatory:
-nto choose the kit name for which the script will configure the project.-pto choose the path to the project configuration file (thepro.userone). This file is created the first time Qt Creator open the project.
If you already have a project but you have no .pro.user file, you could do:
Start Qt Creator.
Open the project created using the Qt Creator menu
File, thenOpen File or Project...and browsing to the.profile.Make sure the Yocto toolchain kit is activated in the
Build & Runsection.Close Qt Creator
If you have no project for the moment, you can create one thanks to Qt Creator:
Start Qt Creator.
Create the project using the Qt Creator menu
File, thenNew File or Project...and answering the questions. The 2 import options is to chooseqmakeasBuild Systemand to select the wantedKitsyou configured previously.Close Qt Creator
Now it is possible to call qtcreator-project-configurator. For example if:
the Qt kit is called
sm2s-imx8plus-kitthe path to the project configuration file is
~/helloworld/helloworld/helloworld.pro.user(file which should have been created the first time you open the project with Qt Creator).
You could do:
    ## On your computer run
    SIMPLESWITCH_TEMPLATE=qt6commercial qtcreator-project-configurator -n sm2s-imx8plus-kit -p ~/helloworld/helloworld/helloworld.pro.user
    ## On your computer run
    qtcreator-project-configurator -n sm2s-imx8plus-kit -p ~/helloworld/helloworld/helloworld.pro.user
Select the Kit and build mode#
The last step before compiling and deploying the SimpleSwitch™ package is to
select the Kit and the build mode. Thanks to the menu Build then
Open Build and Run Kit Selector.., you can then select them.
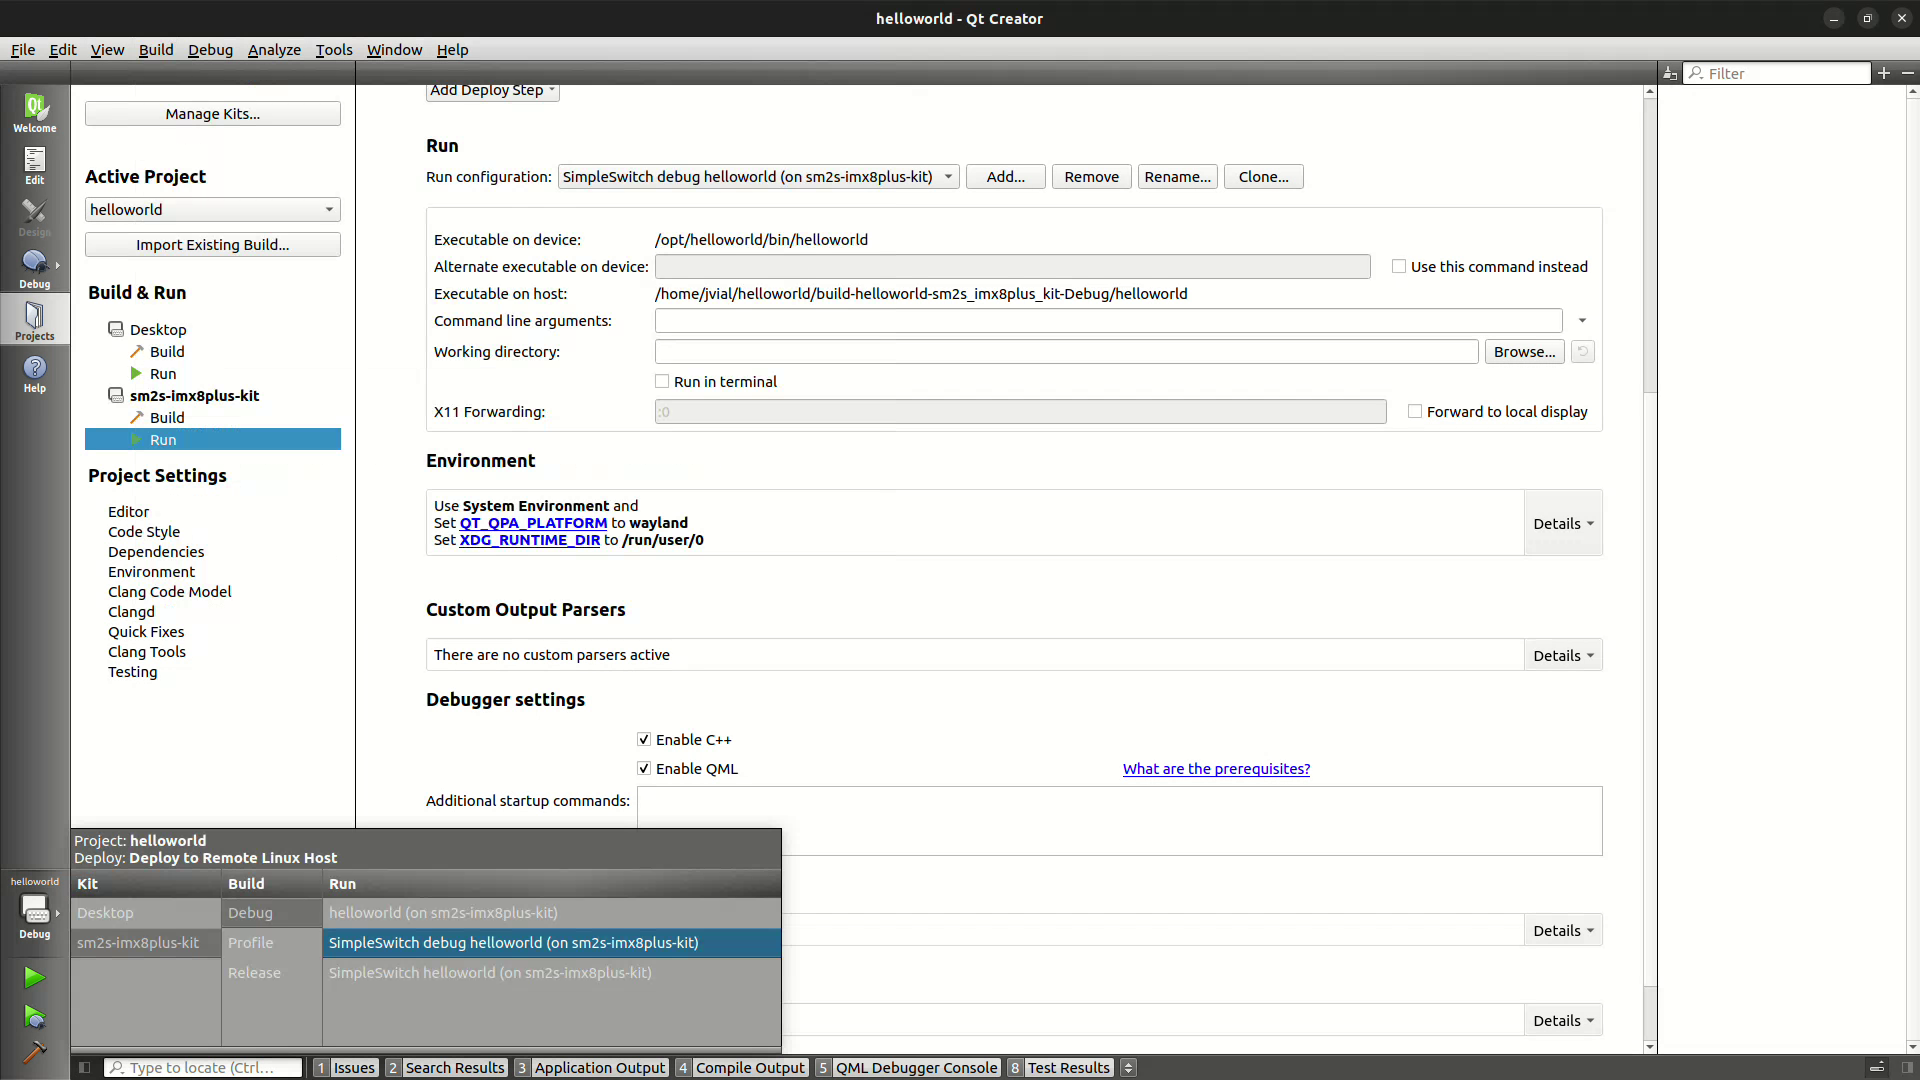
You CAN’T use the button Start debugging of startup project. If you just
want to start the application select the Release build mode
and click on the Run button. If you want to start a debugger select instead
the Debug build mode and click on the Run button. It starts a gdbserver
in the SimpleSwitch™ container.
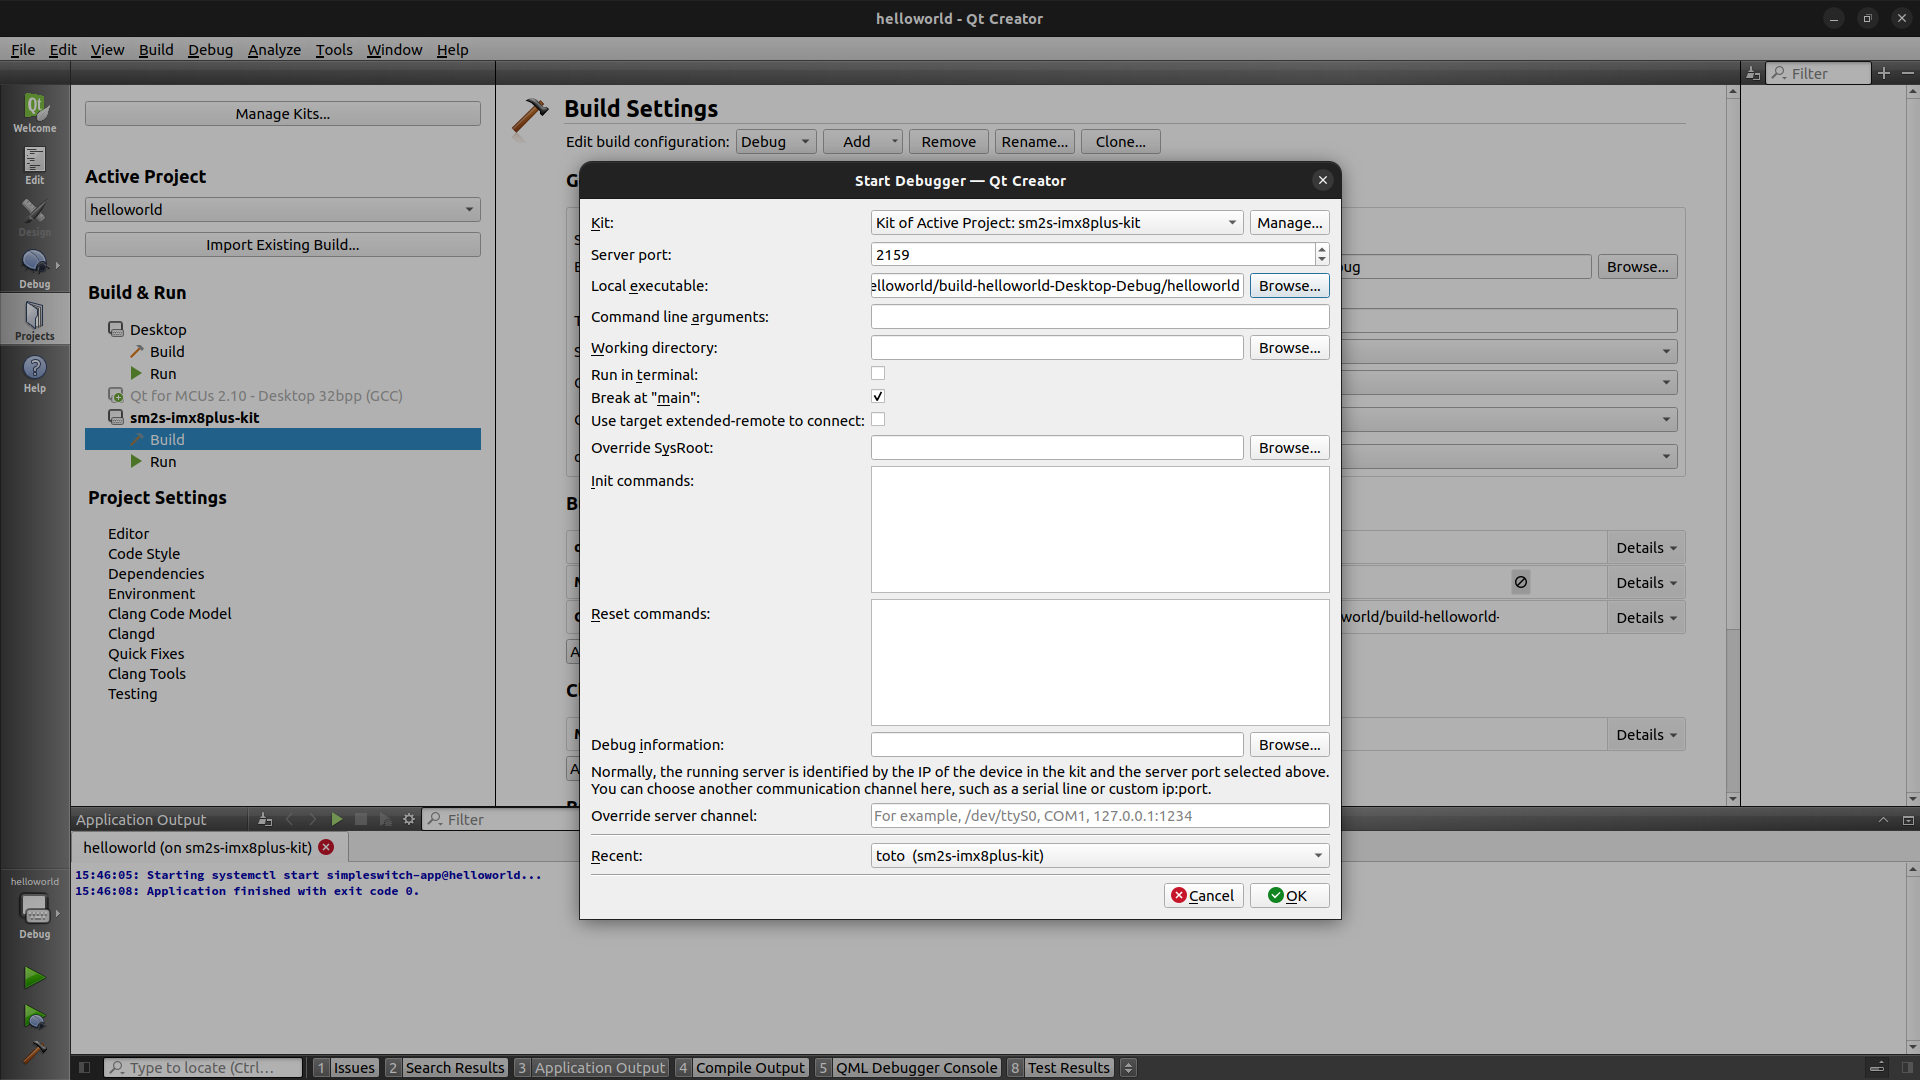
In order to start the debugging session just go in the menu Debug then
Start debugging then Attach to Running Debug Server.... Check that
kit you configure previously is used, select the port 2159, select the path
of the local executable in the Debug build directory. Verify that the
Use target extented-remote to connect is unchecked. Finally press OK.
Option 2: configure Qt Creator manually#
Adding a kit and a device manually#
Depending on your Qt Creator version, the tabs could not be organized exactly the same way as in the following documentation.
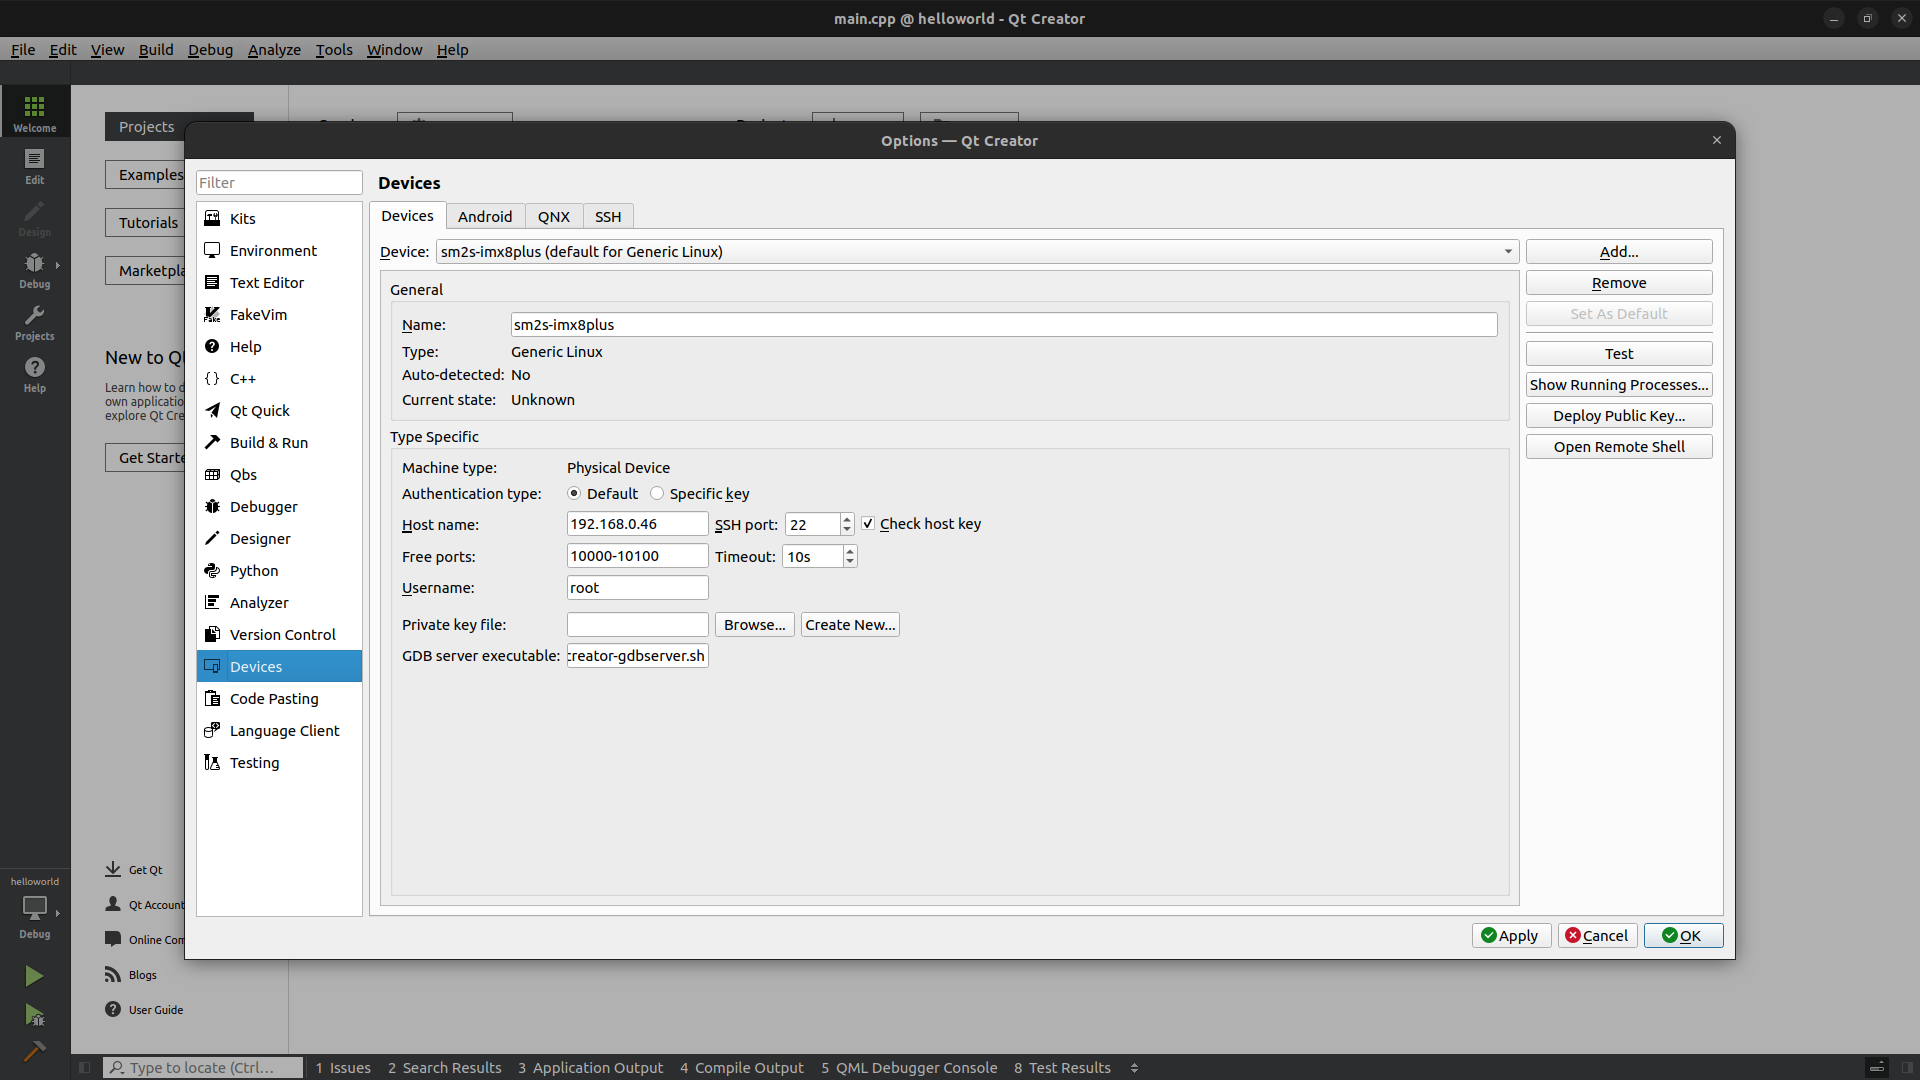
Add a device#
Click on the
Toolsmenu thenOptions....Select
Devicesin the left panel.Click on
Add, chooseGeneric Linux Device, then click onStart Wizard.Enter a name for your device, the IP address of the board, and use
rootasusername.Continue and check that the
Device Testis able to connect to your board.
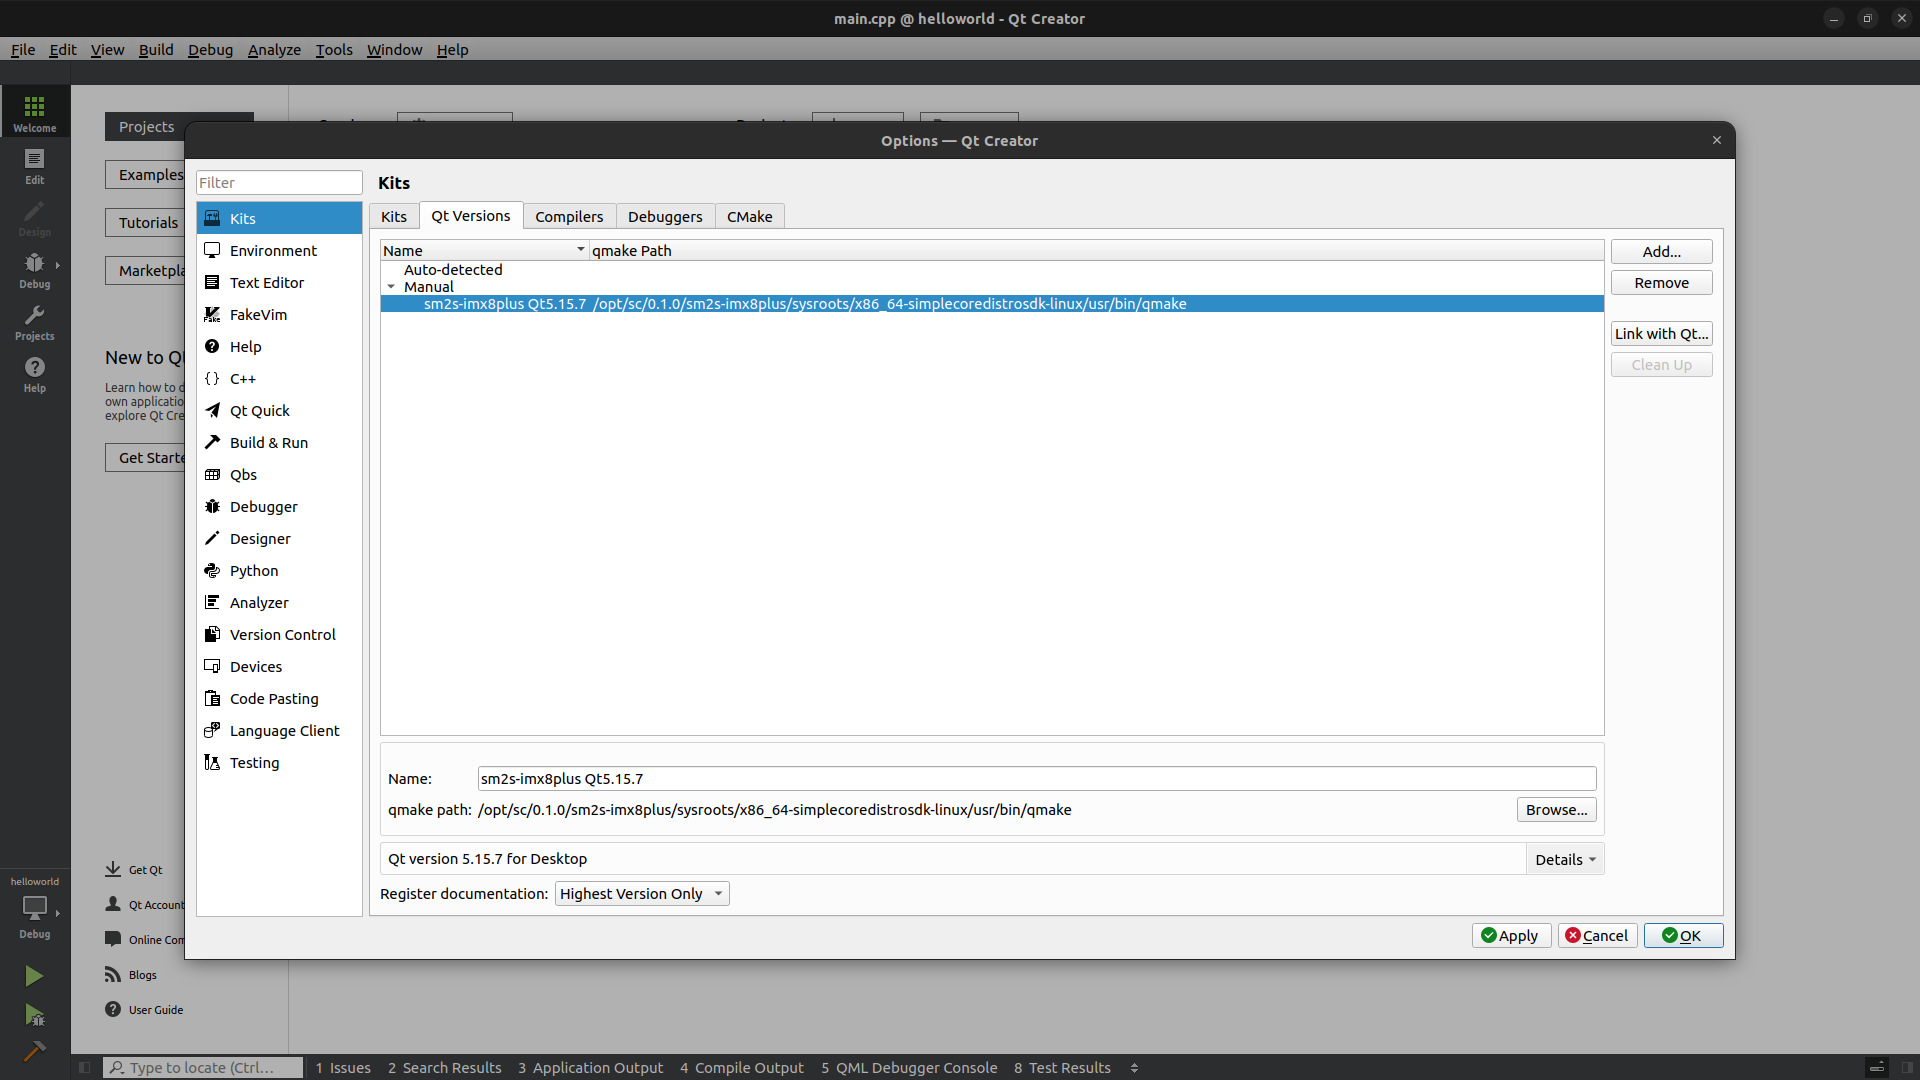
Add a Qt version#
Click on the
Toolsmenu thenOptions....Select
Kitsin the left panel.Click on
Qt Versionstab.Click on
Addand browse to find theqmakeexecutable found in the Yocto SDK. If you didn’t change the default installation path it should be:
/opt/sc/0.1.0/sm2s-imx8plus/sysroots/x86_64-simplecoredistrosdk-linux/usr/bin/qmake
Adapt the name of the version.
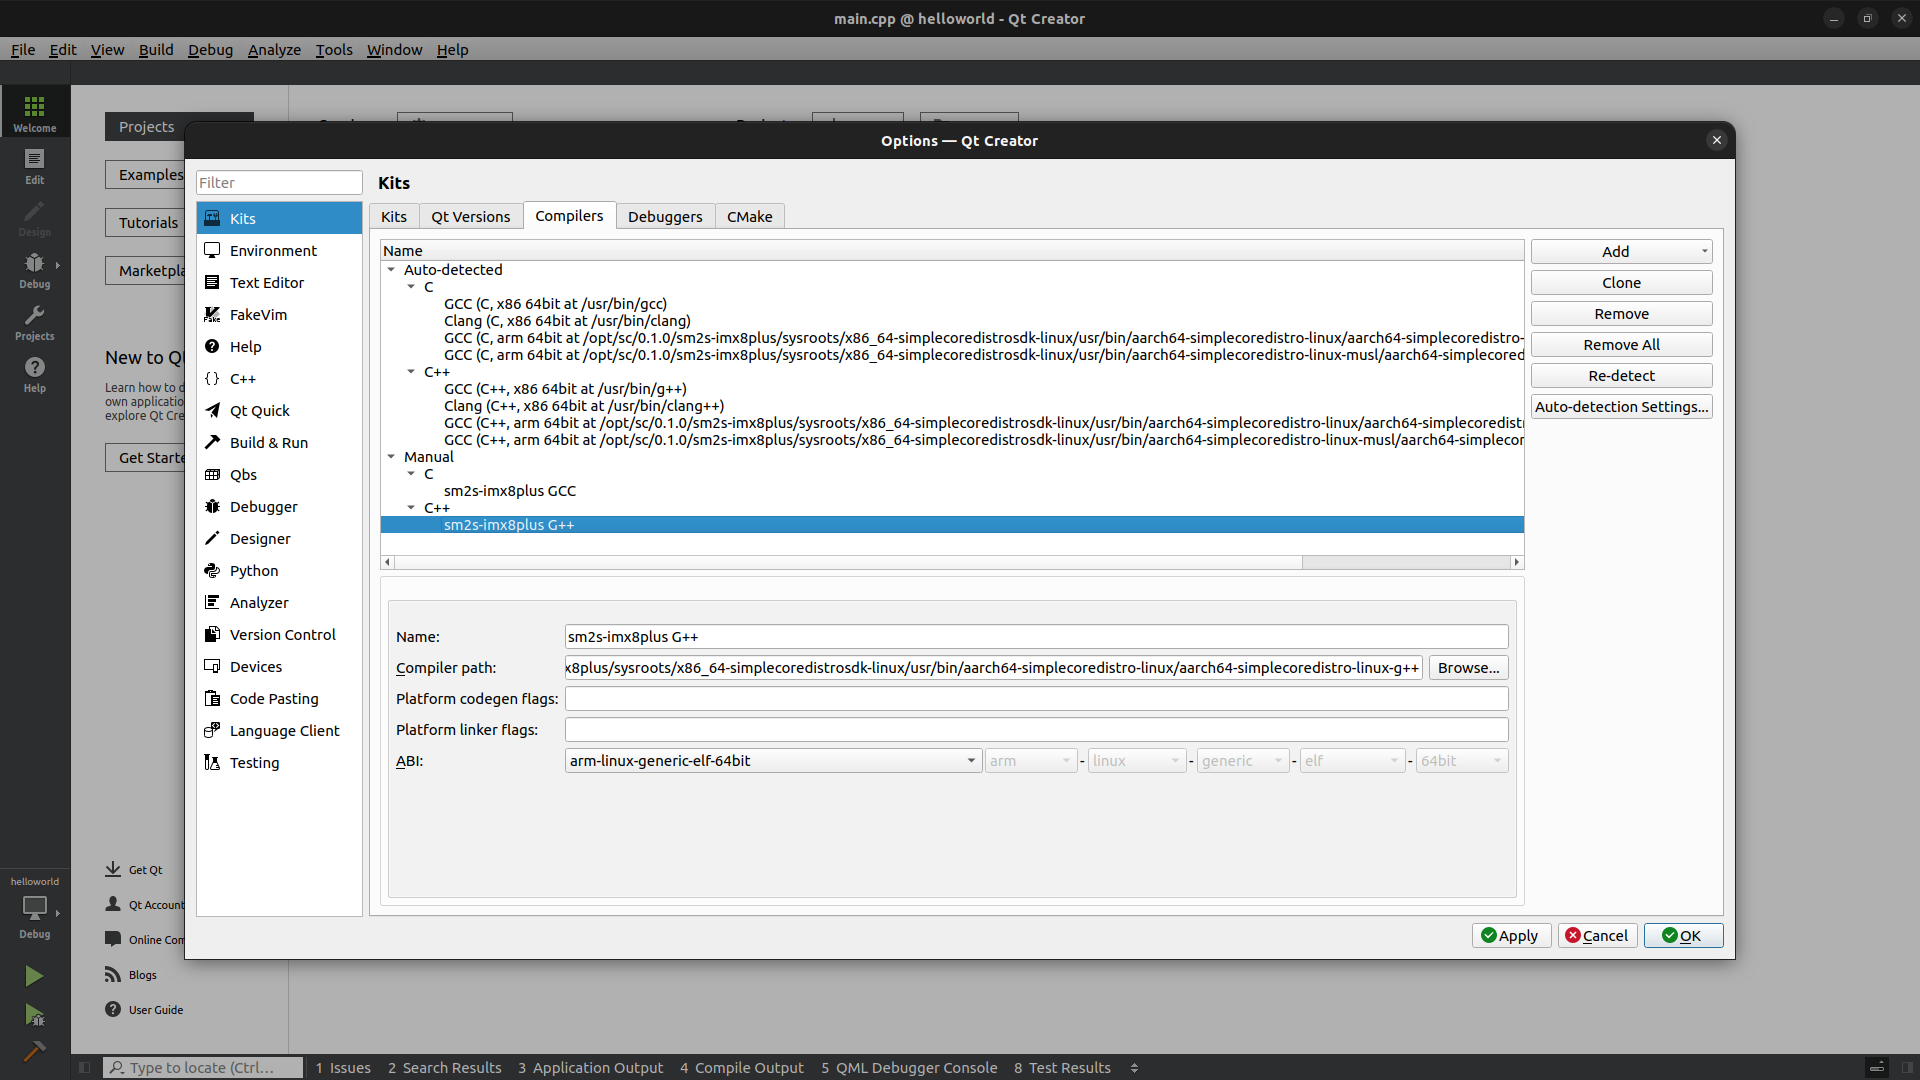
Add a Compiler#
Click on the
Toolsmenu thenOptions....Select
Kitsin the left panel.Click on
Compilerstab.Click on
Add, then chooseGCCand finally chooseC.Adapt the name of the compiler.
Browse to find the gcc executable found in the Yocto SDK. If you didn’t change the default installation path it should be:
/opt/sc/0.1.0/sm2s-imx8plus/sysroots/x86_64-simplecoredistrosdk-linux/usr/bin/aarch64-simplecoredistro-linux/aarch64-simplecoredistro-linux-gcc
Repeat the process adding a
GCCcompiler for theC++choosing:
/opt/sc/0.1.0/sm2s-imx8plus/sysroots/x86_64-simplecoredistrosdk-linux/usr/bin/aarch64-simplecoredistro-linux/aarch64-simplecoredistro-linux-g++
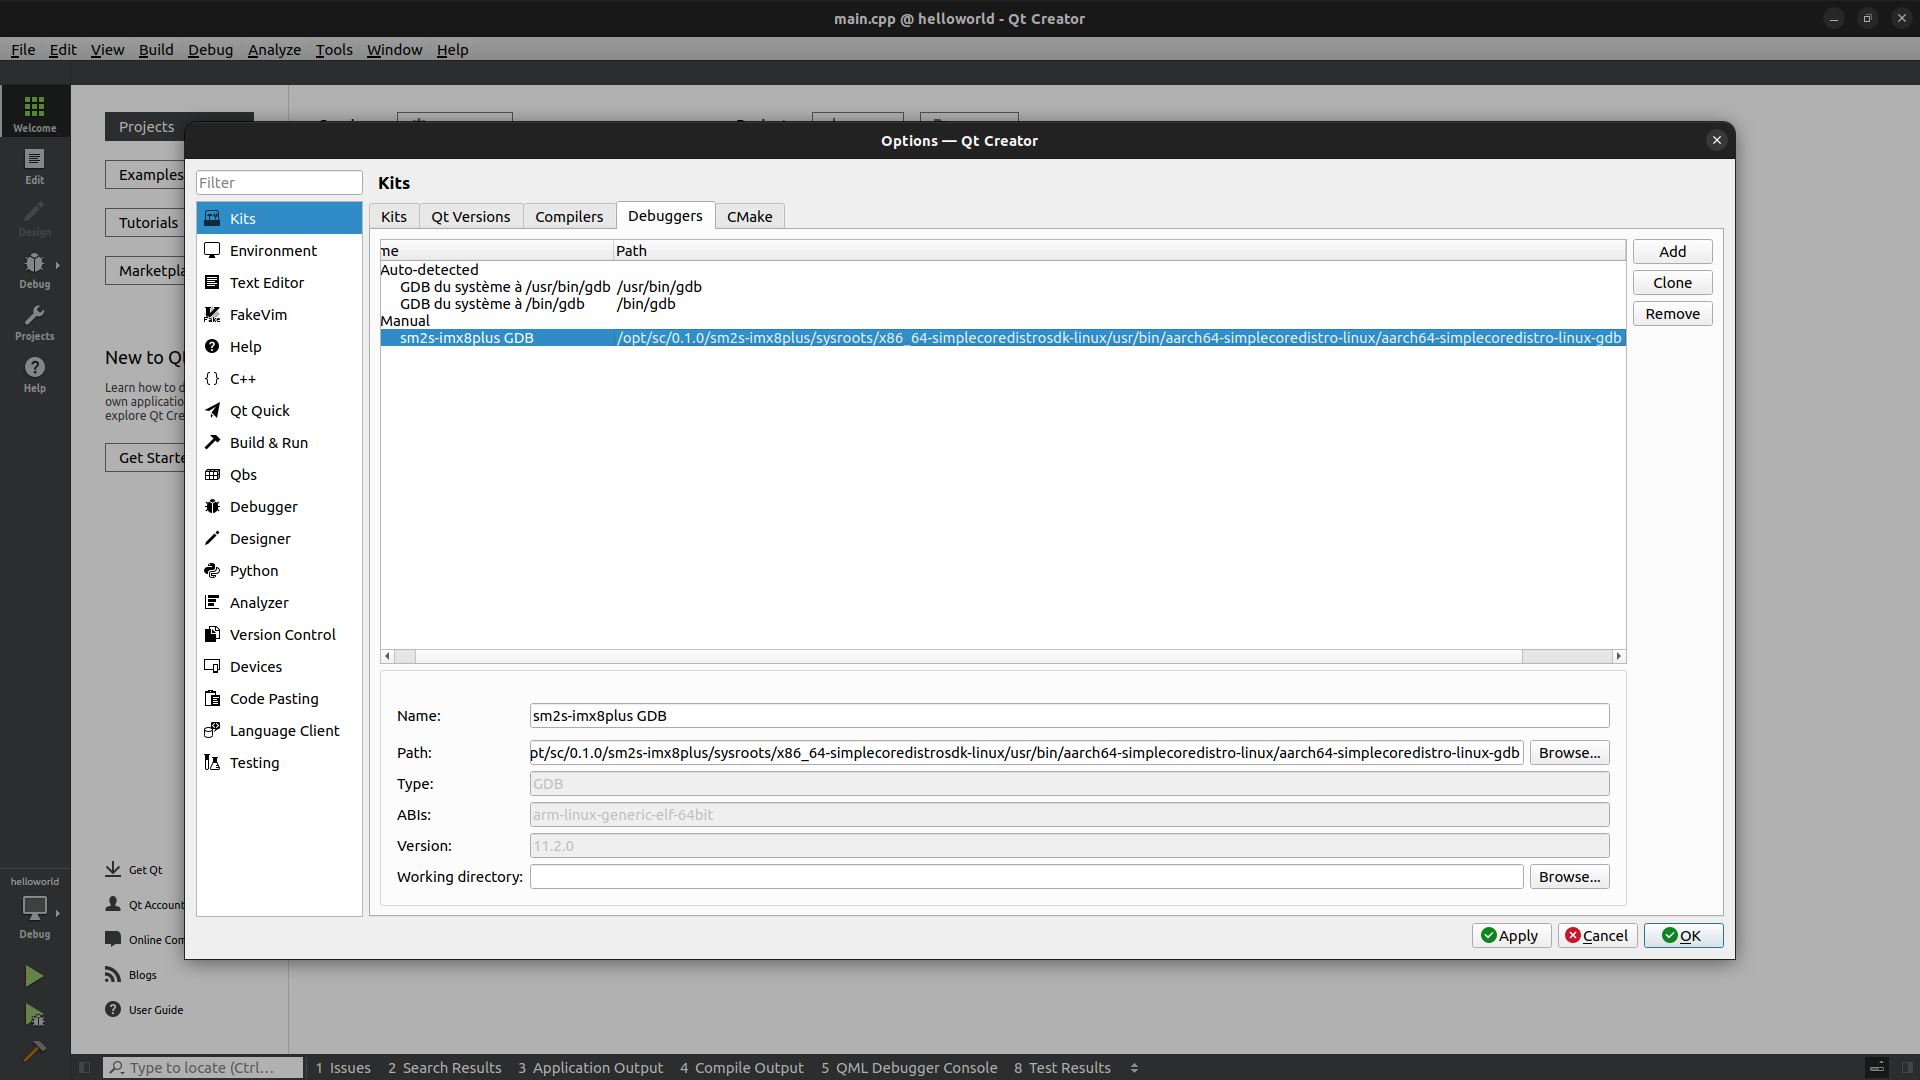
Add a Debugger#
Click on the
Toolsmenu thenOptions....Select
Kitsin the left panel.Click on
Debuggerstab.Click on
Add.Adapt the name of the debugger.
Browse to find the
gdbexecutable found in the Yocto SDK. If you didn’t change the default installation path it should be:
/opt/sc/0.1.0/sm2s-imx8plus/sysroots/x86_64-simplecoredistrosdk-linux/usr/bin/aarch64-simplecoredistro-linux/aarch64-simplecoredistro-linux-gdb
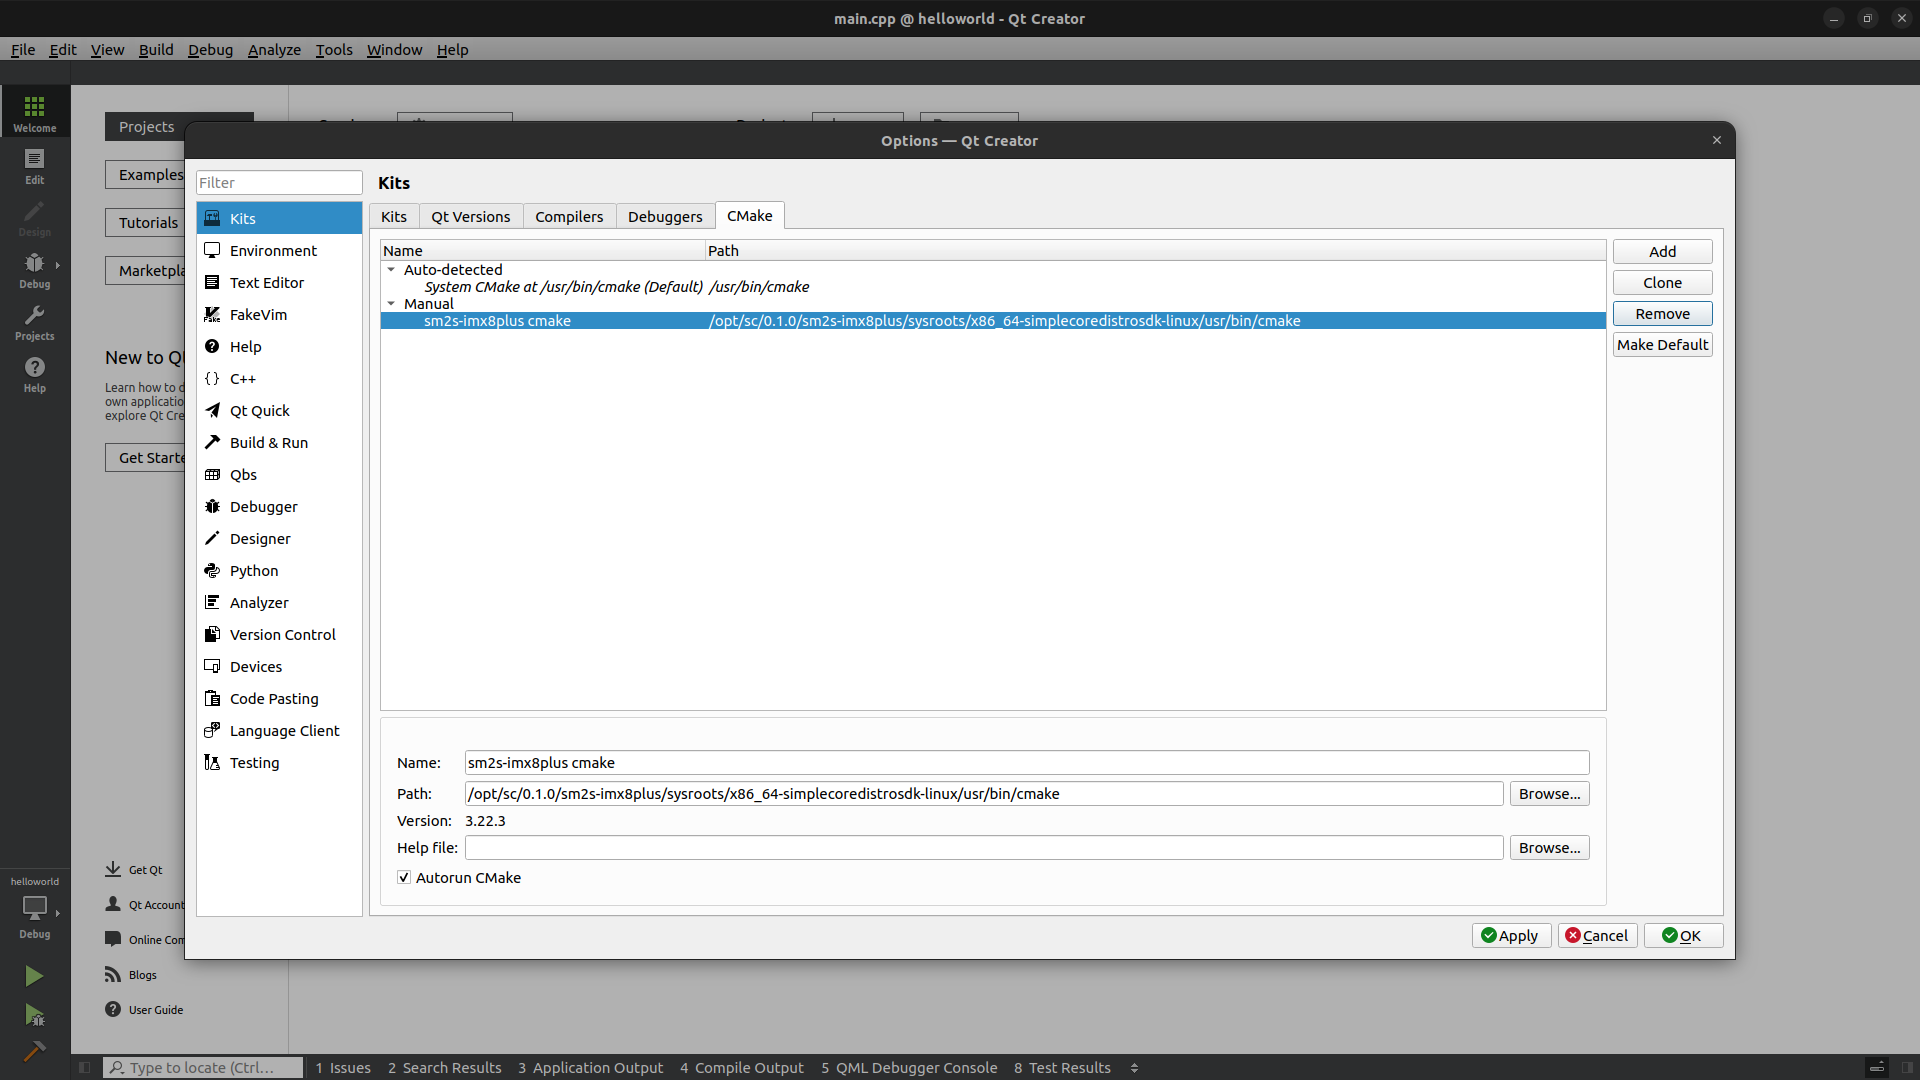
Add CMake#
Click on the
Toolsmenu thenOptions....Select
Kitsin the left panel.Click on
CMaketab.Click on
Add.Adapt the name of the CMake.
Browse to find the
cmakeexecutable found in the Yocto SDK. If you didn’t change the default installation path it should be:
/opt/sc/0.1.0/sm2s-imx8plus/sysroots/x86_64-simplecoredistrosdk-linux/usr/bin/cmake
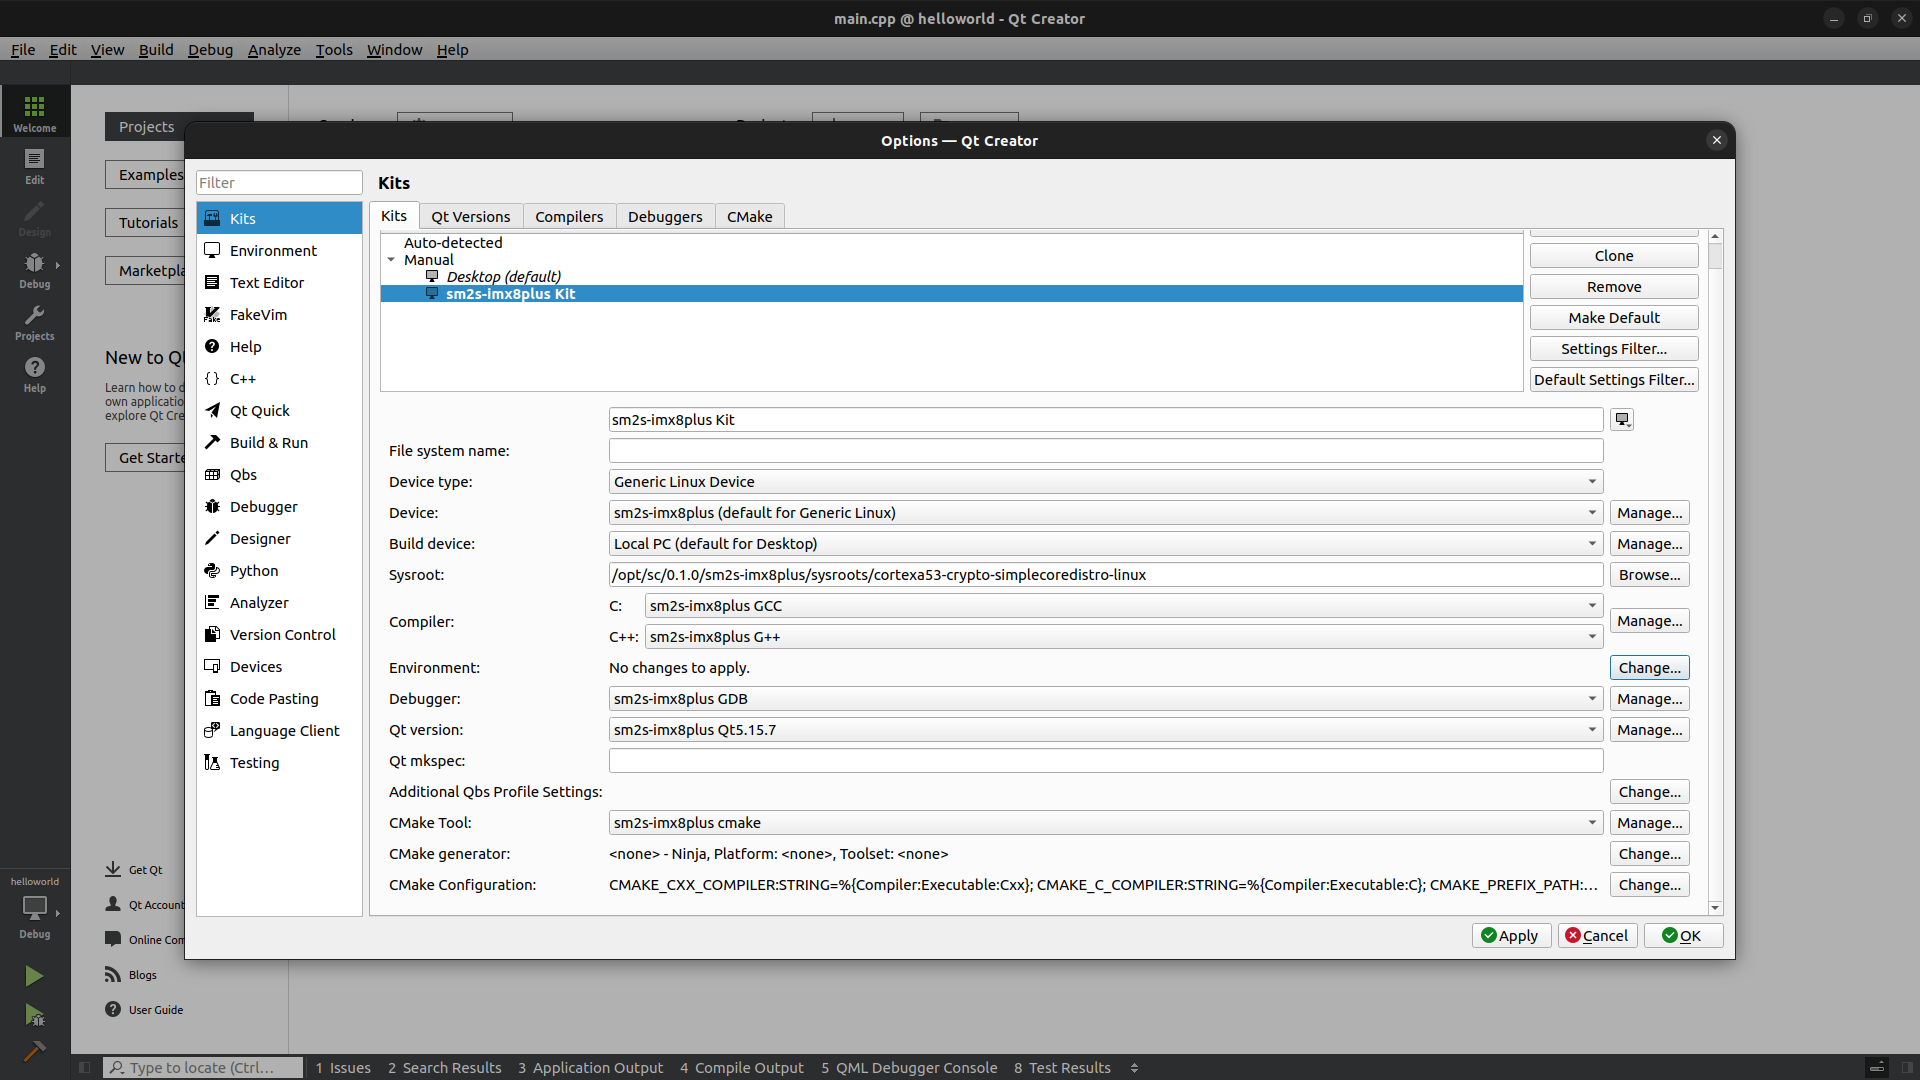
Add a Kit#
Click on the
Toolsmenu thenOptions....Select
Kitsin the left panel.Click on
Kitstab.Click on
Add.Adapt the name of the Kit.
As
Device typechooseGeneric Linux DeviceAs
Device,Compiler,Debugger,Qt versionandCMake Toolchoose the ones you created previously.As
Sysrootbrowse to find the sysroot of the target in the Yocto SDK. If you didn’t change the default installation path it should be:
/opt/sc/0.1.0/sm2s-imx8plus/sysroots/cortexa53-crypto-simplecoredistro-linux/
As
Qt mkspecadd the mkspec of the target in the Yocto SDK. If you didn’t change the default installation path it should be:
/opt/sc/0.1.0/sm2s-imx8plus/sysroots/cortexa53-crypto-simplecoredistro-linux/usr/lib/mkspecs/linux-oe-g++
Configure a project manually#
If you already have a project open it using the menu File, then
Open File or Project... and browsing to the .pro file of the project.
Else create a project using the menu File, then New File or Project...
and answering the questions. The 2 import options is to choose qmake as
Build System and to select the wanted Kits you configured previously.
Then:
Select the
Projectsconfiguration tab (on the left of the screen).Make sure the Yocto toolchain kit is activated in the
Build & Runsection and is configured to run on the device you added (Run/Runsection)In the
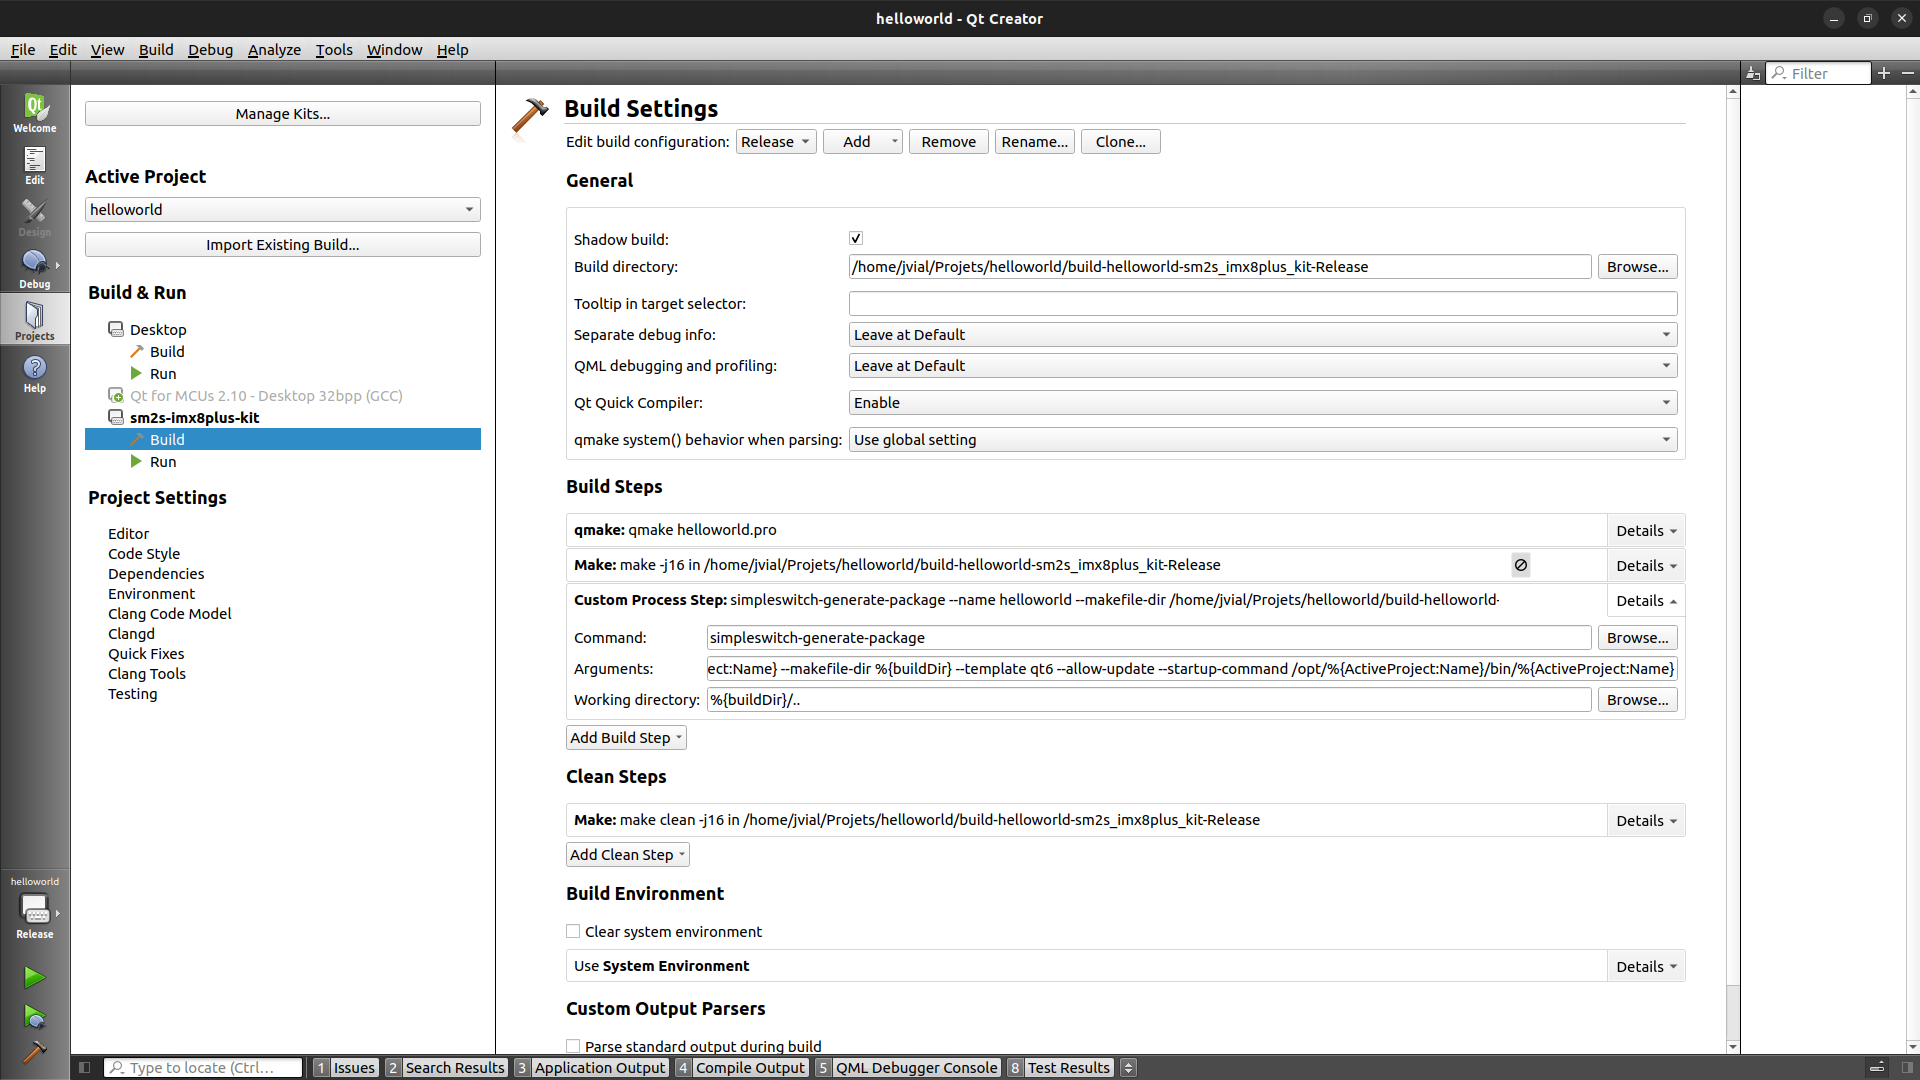
Buildsection we will modify the configuration for both theDebugbuild configuration and theReleasebuild configuration. It is possible to select which build configuration we are modifying thanks to the menu on the top of the page.For the
Releasebuild configuration mode, modify theBuild Stepssection, disablingMakestep (DON’T remove it).In this same section, add a new
Custom Process Stepsto create the SimpleSwitch™ package:
Command:
simpleswitch-generate-packageArguments:
--name %{ActiveProject:Name} --makefile-dir %{buildDir}
--template qt6commercial --allow-update --startup-command
/opt/%{ActiveProject:Name}/bin/%{ActiveProject:Name}
Working directory:
%{buildDir}/..
Command:
simpleswitch-generate-packageArguments:
--name %{ActiveProject:Name} --makefile-dir %{buildDir}
--template qt6 --allow-update --startup-command
/opt/%{ActiveProject:Name}/bin/%{ActiveProject:Name}
Working directory:
%{buildDir}/..
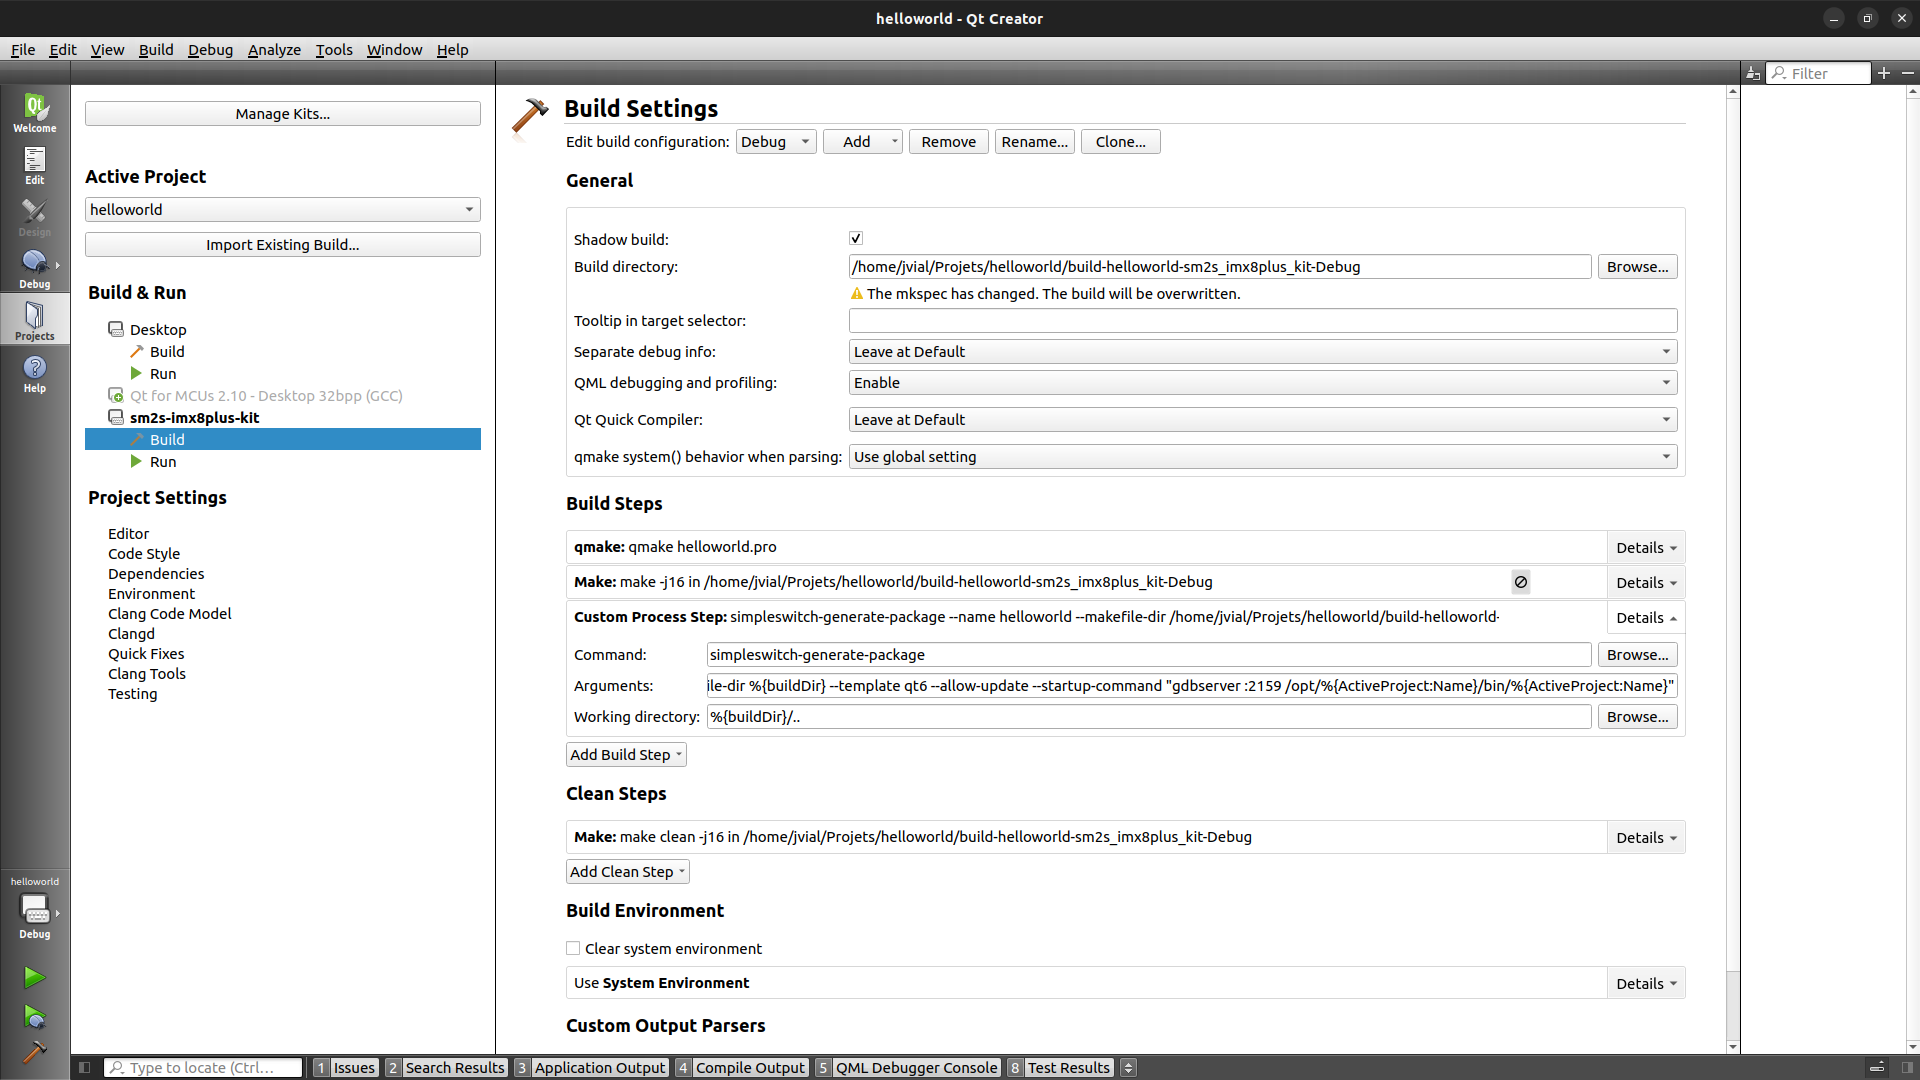
Then edit the
Build Stepsfor theDebugconfiguration mode. Again disable theMakestep (DON’T remove it).In this same section, add a new
Custom Process Stepsto create the SimpleSwitch™ package:
Command:
simpleswitch-generate-packageArguments:
--name %{ActiveProject:Name} --makefile-dir %{buildDir}
--template qt6commercial --allow-update --startup-command "gdbserver
:2159 /opt/%{ActiveProject:Name}/bin/%{ActiveProject:Name}"
Working directory:
%{buildDir}/..
Command:
simpleswitch-generate-packageArguments:
--name %{ActiveProject:Name} --makefile-dir %{buildDir}
--template qt6 --allow-update --startup-command "gdbserver :2159
/opt/%{ActiveProject:Name}/bin/%{ActiveProject:Name}"
Working directory:
%{buildDir}/..
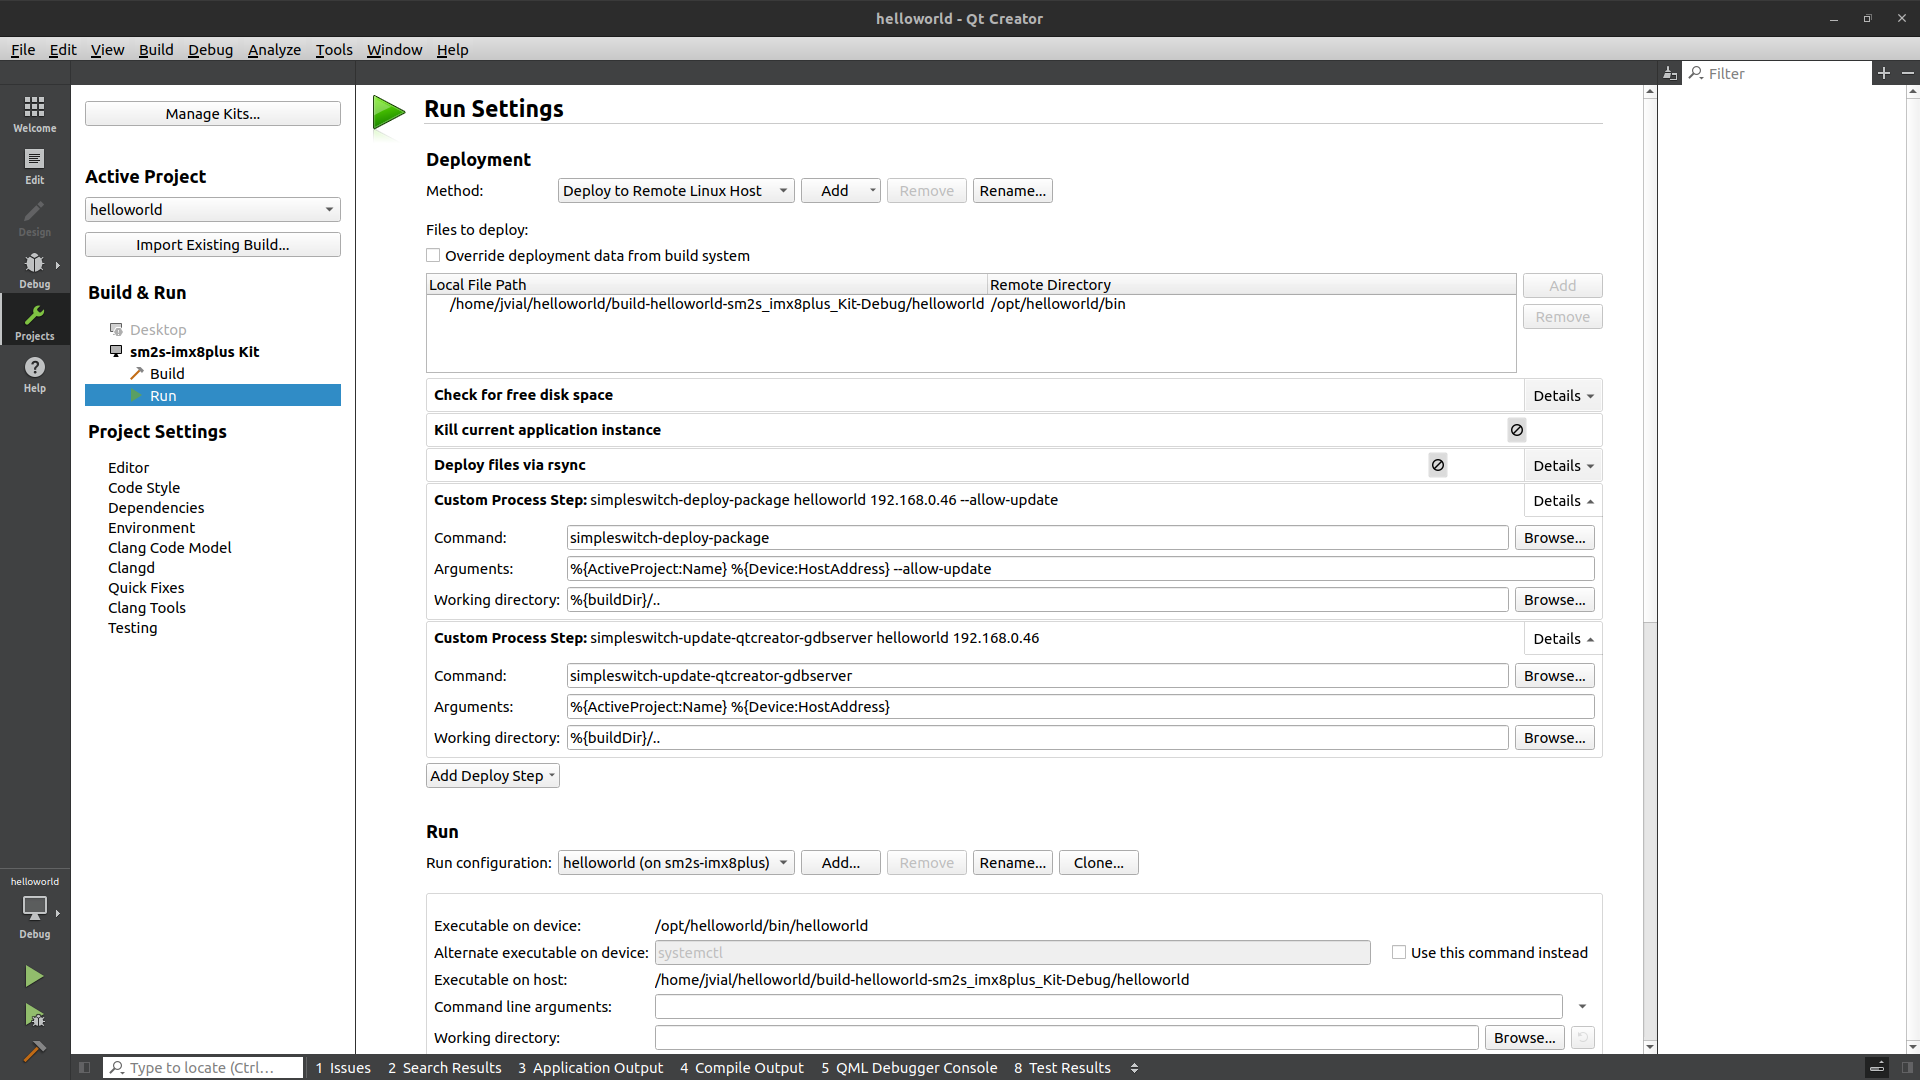
In the
Run/Deploymentsection, disable or remove theKill current application instanceand theDeploy files via rsyncsteps.In this same section, add a new
Custom Process Stepsto deploy the SimpleSwitch™ package:Command:
simpleswitch-deploy-packageArguments:
%{ActiveProject:Name} %{Device:HostAddress} --allow-updateWorking directory:
%{buildDir}/..
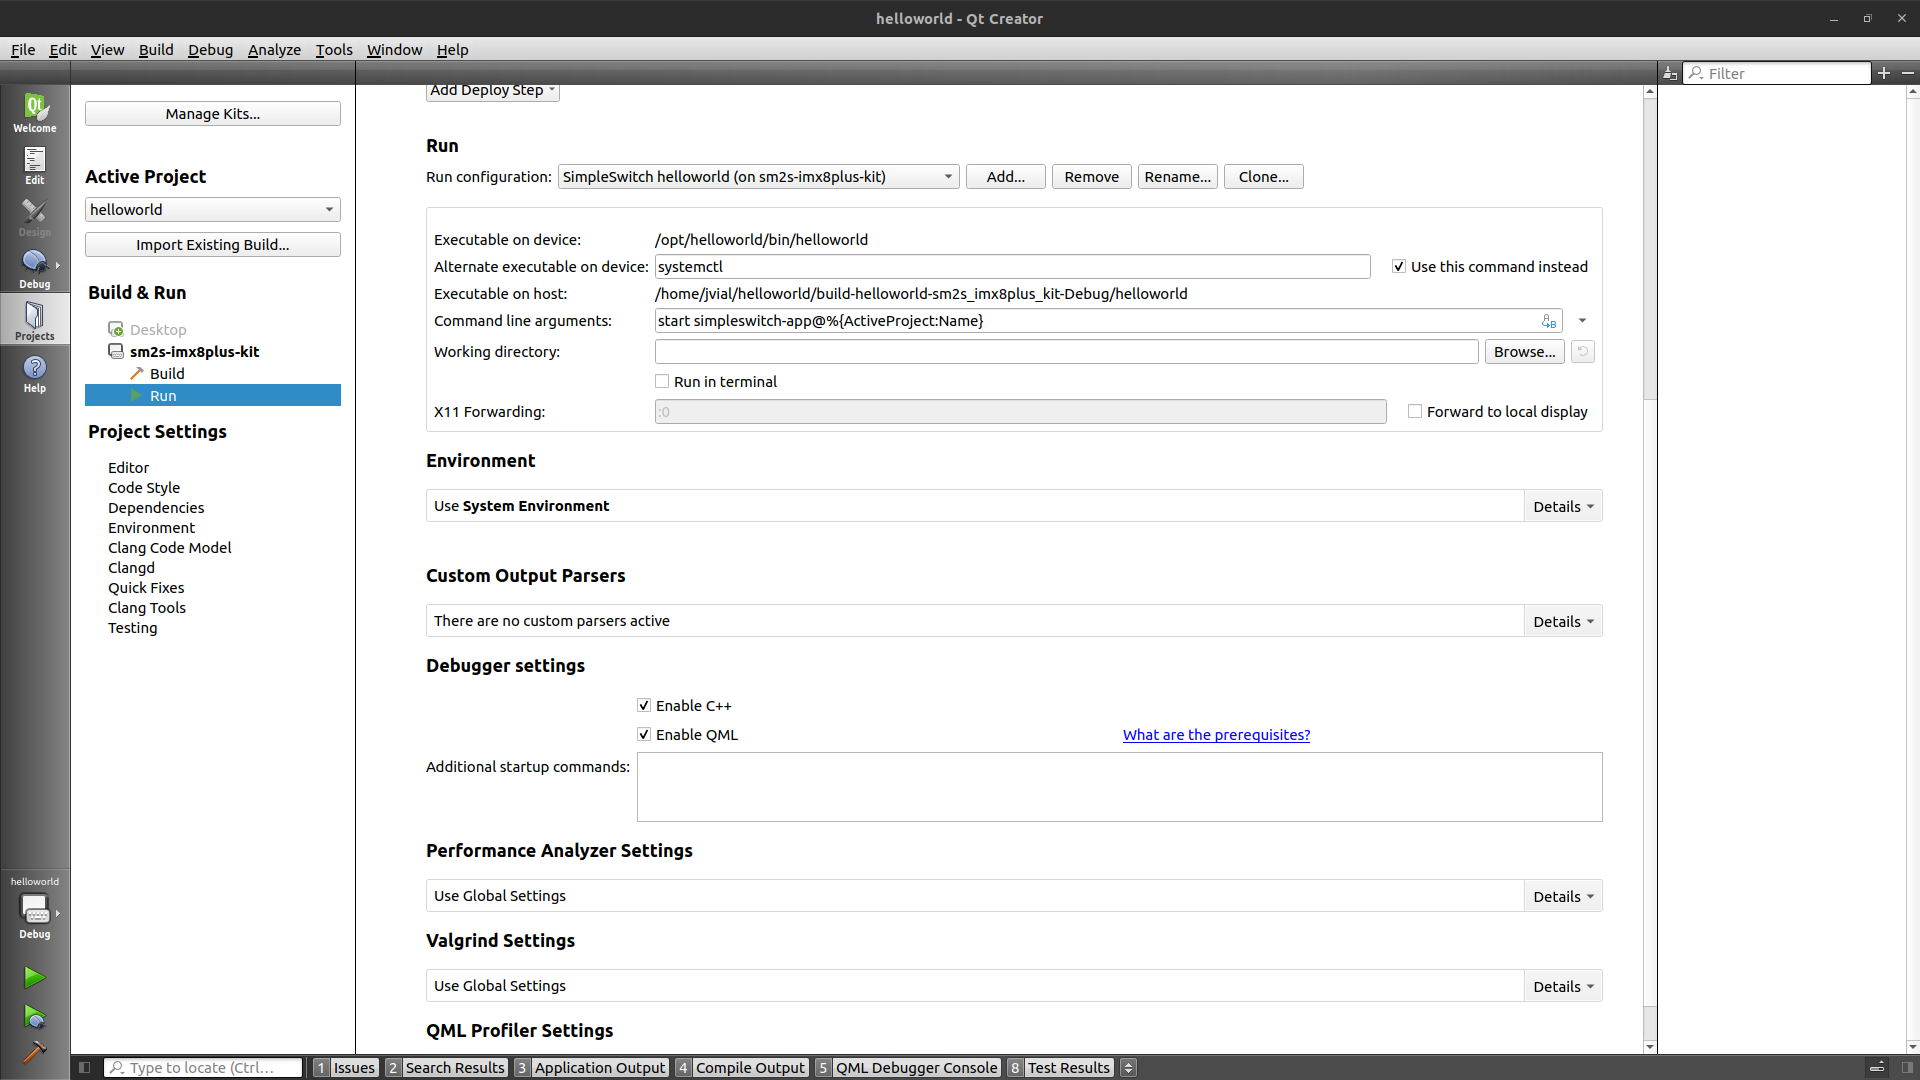
In the
Run/Runsection, you will need to modify the configuration to start the SimpleSwitch™ correctly using systemd. Set the configuration to:Alternate exectuable on devicetosystemctlwithUse this command insteadselected.Command line argumentstostart simpleswitch-app@%{ActiveProject:Name}.
The project has been configured manually as would have been done by the script. Now you can refer to the section Select the Kit and build mode to then be able to compile and deploy the SimpleSwitch™ package.